


Winter is almost upon us as I write this, and the temporary post I made to mark the edge of our driveway is in danger of getting run over one of these dark evenings. But with nothing in the store I liked the look of, I headed into the workshop to see what I could knock up out of stuff I already had kicking around; here’s what I came up with…
I love pallet wood (who doesn’t?!) and Norway is awash with reusable jam jars (called canning jars, Mason jars or Kilner jars in other places), that are attractive to my eye as well as being very tough. A match made in heaven methinks…
A couple of hours later and voila! That should stop anyone driving off the side of our short but awkwardly steep driveway on a dark snowy night!
If you fancy a go, here’s how I made this garden bollard light…
I used four pieces of wood taken from a USA standard pallet, a ‘Norge’ canning jar, and a disc cut from some scrap metal to hold the bulb holder. Oh, and some cable of course.

Materials all ready to go…
Make a rough full-sized sketch to see what size post you need to make. You should aim for a post that has just enough room to hold the jar, but not so small that the jar sticks out past the outside of the wooden post.

Draw a rough full scale sketch to see what size box you need to hold your jar.
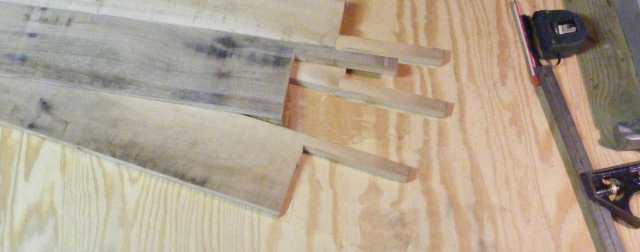
Most pallet timber needs a little work for this kind of project, as it can be a little wavy on the edges. To form a nice fitting box without big gaps simply clamp the sides of the box together in pairs and hand plane one set of edges until they are nice and straight. Rip your wood down to size on a table saw making sure to run the newly planed edges against the fence. The wide sides are the same width as the diameter of the jar and the short sides are the the same as the wide ones, minus twice the woods thickness, giving you a square box, (this may vary depending upon the type of jar).

Planing the timber edges straight in pairs, helps stop wobbling.
Check the edges with a spirit level or other known straight edge and tidy up any high spots with your hand plane. This will make sure your post forms a neat ‘box’ and looks nice and solid. I used butt joints on the corners but you could mitre the edges if you want to really go for the solid wood look.

Plane away until there are no gaps!
Next is to form the slim corner posts. Use a handsaw for the cuts down the grain and a jig saw for the bottom cuts, or a jig saw for the whole thing if you can hold a straight line! Care is needed with these as the corner posts are quite fine and rough handling could easily break them. They become a little stronger once the top is fastened in place.

Be careful cutting these slim corner posts!
An alternative way to build this lamp was pointed out in the comments below and I thought it was a good idea and I’d probably do it this way next time…. instead of cutting the corner posts on two of the boards it was suggested to cut them one to a board, that way each board has just two easier straight cuts instead of the “U” shaped cut I did. Here is a very rough photoshop mock up of how it would look…

Each board will be the same width this way and there will be one joint on each side of the post.
And here is a pic sent in by Wim of his shorter lamp using this alternative method…

Cut a corner post into the end of each plank.
Either way, assemble the box and clamp it together so you can find out how the mason jar fits. I found that the screw on lid was jut a little too big to sit down into the box so I removed a little wood from the inside edge on mine using a table saw technique called ‘coving’ (google it!). This part will not be seen, so you can chew it out with a chisel if you prefer. Keep trial fitting your jar until it fits properly inside the box.

This allows the lid of the jar to sit inside the box.

Assemble again and check jar fits into inside of box.
Screw the box together using exterior grade screws. Decking screws are perfect for this, if a little long. Drill clearance holes in the wider pieces and pilot holes deep into the sides of the other before screwing together. This is because pallet timber can be quite hard and brittle, you don’t want to split anything at this stage…

Stop and re-drill pilot holes if the screws get too tight. Stop the screws flush.

Use silicone to keep the water out but provide ventilation to stop condensation.
To incorporate the bulb holder into the jars lid I cut a metal disc out of a piece of scrap using tin snips and drilled a hole in it to take the bulb holder.
I wired up the bulb holder and assembled it using silicone to keep any moisture out of the electrics. But don’t seal everything up tight or condensation will be a problem. I drilled some weep holes in the metal disc, between the plastic lamp holder and the jar retaining ring (once the silicone was dry). Occasionally condensation will form on the inside of the jar but the heat of the bulb soon dries it out.
How you do this may vary, depending on the style of your jar and what you have to hand to make the flat part of the lid, just don’t forget to get some air in there somehow!
To make a top for the post, place a square offcut of pallet wood on top of the four thin corner posts and center it up. Mark around each post not forgetting to mark the lid and inside the post to maintain the correct orientation. Drill a clearance hole through the centre of the marks you made and a deep and generously sized pilot hole down the centre of each corner post. Remember these posts are very thin and will easily split, the pilot hole should be large enough that the screw goes in very, very easily.

Mark all around each corner post, note the F marks to denote the ‘front’.
Now you can thread the cable through the post and slide the jar into place. Push the screws for the top through the clearance holes in the top and line each one up with the pilot hole in the corner posts, gently screw the top down. If a screw gets tight, remove it and drill bigger pilot holes.
To mount the post I used a piece of 70mm x 70mm timber screwed into the bottom of the bollard post, projecting 150mm and slotted this into a metal fence post holder.
Let me know how you got on with yours!
Stay well
By Ian Anderson
p.s. The house number is one I carved into a lump of firewood a while back.
p.p.s POST UPDATE
I’ve been playing around with different LED light bulbs (since the bollard lamp is on all night….) to save energy, here is a couple I’ve tried from Simply LED a new supplier I’m trying…

So far, so good, the one that’s illuminated in the pic looks like a little Christmas tree! The other one is too bright I think, so that one will go into a tall lamp we have. Other wise of course you can get LED bulbs from amazon.
LED’s are certainly the way to go these days, I’m gradually changing all of our bulbs over and loving the clean light and look.
Solar Version of the Garden Bollard Lamp

Solar power!
After lots of comments about making a solar version of this garden lamp someone has finally made one! Akis Mavridis over on Pinterest posted a picture of it and how nice it looks too! Many thanks Akis!

Comments 47
Hi Ian! I am happy that you like my solar version that is basically inspired by your lamp.
Best regards
Akis
From the Netherlands:
Is this design safe? What does the insurance do when something happens? In the Netherlands this would be immediately rejected! As can be seen, the fitting and the cable are not suitable for outdoor use.
In the Netherlands it must be at least splash-proof class IP44.
The cable for the outside of the ground is the XMvK cable.
The cable outside the ground the YMvKas cable.
Author
Hey Joop,
Of course you have to build your lamp to comply with local electrical regulations, my lamp is for illustrative purposes only. Water getting into live electrics is of course dangerous. The electrical connections for my lamp are inside a glass jar which is pretty waterproof and under a wooden top. You should purchase fittings and cable suitable for outdoor use and to comply with the law in your area.
Ian
Hi how did you run the power supply to and from the light
Author
Hey Rob,
Sorry, missed your comment, it’s been mad here. At the moment I just run a temporary cable behind a kerbstone (made from an old extension lead). When we re-do the driveway I’ll bury a small armoured cable under the brick.
Cheers
Ian
I love this. I wish I had the tools to do it. A solar one would look great up by my driveway to help mark a tricky ending. Great idea!!
Author
Thanks for the kind words Patricia! That’s what I use mine for, to highlight a difficult place on my driveway. So difficult in fact that two people have run over the post to date, even though its whole purpose is to highlight a place NOT to drove lol! Oh, well.
Stay well
Ian
How wide did you cut the slats? Looking to build a solar powered one
Author
Hey Jamie,
Sorry for the delay! I kept the width of the pallet wood, which I think was 110mm if memory serves me right. Good luck with the solar vers.
Cheers
Ian
Is the mason jar upside down in the wood box?
Author
Yes, it is upside down and with holes drilled around the edge of the lid to allow any condensation to vent to air etc.
Cheers!
Ian
would this work with a solar powered light?
Author
Hey Cindy,
I don’t see why not, you’d just need to modify the lamp post top to incorporate the solar sensor…..
Send me a pic when you finish 🙂
Cheers
Ian
Like the ideas
These are fantastic but I haven’t got time to make them, I just want to buy them at least eight to ten of them with out the number on, is there any where I can buy them
Author
Hi Tony,
Not commercially, but you could always approach a local chippie to make them for you. Show him mine via the website and get a price etc.
Good luck with the project!
Ian
hi tony could you use solar panel lights
the design and use of mason jars is great.I have made a number of garden lights that are powered by low voltage transformers Easy and safe to work with. The wires can be buried in the ground. Low voltage transformers for low wattage can be bought for about 30 dollars .I’m going to start tomorrow with some new lamps using mason jars. I’ll let you know how i do
These lamps look really awesome, good job! But how did you mount them in the ground? Did you screw them to a concrete foundation? I think they don’t like too much water, right? Thanks for your ideas.
Author
Hey Karsten,
I knocked a metal post holder in the ground (http://thumbs3.ebaystatic.com/d/l225/m/mheMjz-Tc0QKlhyqrGPEFaw.jpg) and then popped the hollow pallet wood post over a short ‘stub’ of regular square post. That way the foundations are longer lasting and the post could be easily replaced if need be.
Thanks for the kind words Karsten, good luck with yours!
Ian
I would use a solar-powered light
Author
Great idea Darlene, I also want to make some shorter ones with solar lights, but I don’t seem to be able to find any good solar lamps that are capable of lasting a good while. The cheap ones I bought locally only lasted a few months before putting out a miserable glow of light.
Stay well
Typical solar batteries only last a year, however rechargeable ones are easily available. AA is what they are. Look up on youtube. Nice project John
What about a penny battery for the light
Author
With some modifications I’m sure it’s possible!
Ian
I just love this! I have to do the same for my garden! I live on France, not far from Lyon, I’ll send you a picture when I eventually build it…
Author
Great, I’d love to see that Girouette! Don’t forget the little tip to change the design at the top to make a thin post on each board.
Thanks for the comment!
Ian
Great for garden or patio lighting.DIY PROJECT
I love this, I am going to use your design with the solar ideas from your comments. Thank you so very much Ian. 🙂
Author
You’re welcome! You could try the different way of cutting the boards as per the comment from Wimster….
Make the little corner posts one per board. It means you can make four identical boards with an L at the top. Only two straight cuts to make per board also simplifies the lot! Simply make the small posts at the top the width of the board for it to work out square.
Great idea and I think it’s easier than my method.
Would love to see pics once you’re done.
Thanks for the comment!
Ian
Ace project! My suggestion is to make the little corner posts one per board. It means you can make four identical boards with an L at the top. Only two straight cuts to make per board also simplifies the lot! Simply make the small posts at the top the width of the board for it to work out square.
Author
Perfect idea Wimster, smart thinking! It would indeed be a little easier that way and the post would look better too as there’d only be one joint on each side. Nice!
Thanks for that, I might even amend the post one day if I get around to it,
Cheers
Ian
What do u mean by L cut? I’d like to make this for my husband since he’s always making things for me. I just stink at knowing what this stuff means. I broke down my pallet, have the wood ready but the pic above there’s notches cut in the boards for the jar.how do u do that?
Author
Hi Nicole,
The ‘L’ shape was a modification suggested by Wimster to simplify making this lamp. See this pic….
As for the notches, well I used a table saw and what you need to do depends on the size of your wood and the size of your jar (to make notches small or bigger etc.).
You can also do it by making shallow cuts on the back side with a hand saw and then chiseling out the notch.
Let me know if you get stuck!
Ian
I think this would make a great “prim” indoor floor lamp if you put a wide base on the bottom of the post.
Pretty slick idea, a few cautions though. Might want to leave a couple of weep holes in that jar lid contraption. There will be condensation inside that jar. Sorry, pro electrician. any DIY electric needs to start with safety 1st, and any non UL listed / homemade equipment can be iffy. Water and electric and all. Maybe stick to low volt or solar.
Author
Good point Bob and you are right, I do occasionally get some small condensation on the inside of the jar, I made it ‘waterproof’ thinking that this would be the safest. If I drilled a couple of holes in the lid, i.e. the bottom part of the contraption, I wonder if this would provide enough ventilation/drainage to stop the condensation? If so I can try it and amend the article, credit to you of course 🙂
Thanks for helping Bob!
My experience has been that pallet wood rots quickly in outdoor applications. Be sure to treat the wood thoroughly with a good wood preservative prior to installation.
Author
I would agree normally Jeff, but I was lucky enough to find some USA pallets which are made from a hardwood and have lasted pretty well here in our climate. I did give them a coat of yacht oil though.
If you aren’t looking to run wire across the yard try breaking the solar light part off of a solar light stake and place it in the center of the lid as he did with the light socket. Be sure to make the top open for light but not open for water or snow to enter. Place a piece of clear plastic over the top. It will charge all day and glow at night. To illuminate your carved numbers you could paint the inside of the numbers with glow in the dark paint. Again charges all day and glows most of the night. Hope that helps some. Great idea using what you got! Love that!
This is awesome! Great idea instead of buying a new lamp for outside. I think you could adapt this to solar power still using the mason jar. There are tutorials on Pinterest to make a solar lantern using a mason jar. I think you would just need to cut a circle hole in the top of the cap to let the sun charge the solar light 🙂
Author
Good idea and in fact I might just convert mine as changing the timer to coincide with darkness gets old real quick lol! Thanks for stopping by.
So this has to have power available? I was looking to do some thing like this out in the yard but wont want to have cords running across the yard 🙁
Author
Hey Connie,
Yes, this one is mains powered but I guess it is easy enough to use the concept and make one of your own using an alternative power source? Good luck and I’d love to see pics when you’re done because I have a couple of spots where I don’t have power as well!
Thanks for stopping by
Ian
I’ve seen plenty of DIY instructions for making mason jar solar lamps, I’m thinking you could build the same thing, but use a solar lamp and not have the wood cap? I know my neighbors put a solar light into a post with their address numbers on it.
Josephine if there are “plenty of DIY instructions for making mason jar solar lamps” go find them & use them. This is Ian’s “Make a garden ‘bollard’ driveway light out of pallet wood and a glass jar” with electricity. Now its your job to take the ideas Ian gave you & create your own DIY project.
use solar lights or oil and wicks, that way you can get citronella oil to help with pests…